Install Cockpit Console on Debian 11 Bullseye or 10 Buster server, a Web graphical interface to control Linux server and run docker Image containers using Podman remotely using the browser.
The cockpit is an open-source application light in weight and easy to install. In most popular Linux, the packages to install this application is available via the default repository of the operating system. It provides the real-time stats of RAM, processor, and disk directly on its web interface. Apart from this, we can manage services, accounts, users, storage, software, and also there is a Terminal app that lets the users issue all commands with root rights on the remote server.
Steps to install Cockpit Web Console on Debian 11 or 10 Server
The steps are given here can be used for both Bullseye and Buster Servers running with CLI or GUI desktop environments. However, you must have a user with sudo rights and a working internet connection to perform this tutorial.
1. Run system update
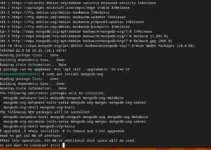
The first thing we should perform before installing any software is running the system update command. This will update all the existing packages and also refresh the system repository.
sudo apt update
2. Install Cockpit web console Debian 11 Bullseye
Packages to install Cockpit server manager are available in the default Debian repository, hence we don’t need to add any third-party repository on our system. Just use the APT package manager command given below and you are done.
sudo apt install cockpit -y
For the latest version:
For those who want to get the latest version of this web management console then we have added the Debian Backport repository:
Add Backports
Edit Source list:
sudo nano /etc/apt/sources.list
At the end of the file, add the following two lines:
echo "deb http://deb.debian.org/debian bullseye-backports main contrib non-free" | sudo tee -a /etc/apt/sources.list
echo "deb-src http://deb.debian.org/debian bullseye-backports main contrib non-free" | sudo tee -a /etc/apt/sources.list
Save the file Ctrl+X, type Y, and hit the Enter key.
Set Cockpit Package priority:
Edit preferences
sudo nano /etc/apt/preferences
Now, add the following lines
Package: *
Pin: release a=bullseye
Pin-Priority: 500

Package: cockpit
Pin: release a=bullseye-backports
Pin-Priority: 1000

Package: *
Pin: release a=bullseye-backports
Pin-Priority: 100
Save the file Ctrl+X, type Y, and hit the Enter key.
Update the repo:
sudo apt update -y
And again run the installation command:
sudo apt install cockpit -y
3. Start and enable Cockpit Service
The Cockpit service will not start automatically, hence we have to start and enable the same manually so that even after a server reboot, it could start itself without issuing the command again.
Start
sudo systemctl start cockpit
Enable
sudo systemctl enable cockpit.socket
Check the status of service to confirm:
sudo systemctl status cockpit
4. Allow Port in firewall on Debian 11
Although the port to access this open-source GUI server manager on Debian 11 or 10 will atomically get whitelisted in the firewall, however, still, run the below command to confirm the same:
sudo ufw allow 9090
5. How to access Cockpit Web Interface
Open any web browser of a system that can access the IP address of the Debian 10 or 11 Server where you have installed the Cockpit web console. In URL box type- http://your-server-ip-address:9090.
You will get a warning of HTTPS error, here click on the Advanced button and then Procced/Continue unsafe link.

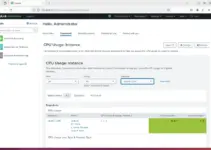
6. Login
Use the username and password of the user available on your Debian server to access the Web console Dashboard.

7. Install Container to use Docker images on CockPit
Error: package cockpit docker has no installation candidate if you try to install it using APT.
Now, those who are interested in running containers on Debian 11 or 10 but using the Cockpit web interface can install Podman because Docker is not available for it. However, don’t worry Podman is exactly the same and also its command line works like Docker CE. Hence, use the given command:
sudo apt install cockpit-podman
8. Create Podman Cockpit Containers: Error: Unable to search for images.
Now, to create containers using Podman on Cockpit, click on the option given for the same on the left side menu. After that, click on the Start button (given in notification).
To pull any Docker Image from its library to create Containers, click on the “Get Images” button. There Enter the name of the image you want to pull. For example – ubuntu.
However, in our case the Podman was unable to pull images, it is because the library path for Docker images has not been declared in the Debian Podman configuration file. Hence, go to your server command terminal or directly access it from the Cockpit to edit the configuration file.
sudo nano /etc/containers/registries.conf
Scroll to the end of the file and copy-paste the following lines:
[registries.search]
registries = ['docker.io', 'registry.fedoraproject.org', 'quay.io', 'registry.access.redhat.com', 'registry.centos.org']
Save the file by pressing CTRL+O and then hit the Enter key. To exit the same use Ctrl+X.
Restart Podman:
sudo systemctl restart podman
Now, go to Cockpit Podman, hit the Get Image


In this way, we can install Cockpit on Debian 11 or 10 using the command line to manage the Server’s Applications, Services, Software Updates, and more remotely.
9. How to update Cockpit
Well, running the regular update and upgrade command of Debian using the APT package manager will automatically fetch and install, if there are any latest packages available for this Web-based system management platform.
sudo apt update && sudo apt upgrade
10. How to Uninstall or Remove Cockpit
If you don’t require the Cockpit Admin management platform, then we can completely remove it using the command line, here it is :
sudo apt autoremove cockpit


It helped me. Thanks